
No fluff. No jargon. Just the exact steps to get your first Google Ads campaign live, including the things Google won't tell you!
For example... that most first Google Ads campaigns lose money...
Not because the platform doesn't work, but because people skip the setup steps that actually matter.
This guide covers what to do and in what order to successfully set up a Google ads campaign. Follow it and your first campaign has a real shot at working.
Google will often offer free setup calls. Their reps are incentivised to increase your spend, not your return. The advice in this guide is independent. Take anything Google recommends with a grain of salt until you understand what you're doing.
Do These 3 Things Before You Touch Google Ads
Most people jump straight to campaign setup. Then they spend their first $500 figuring out what they should've sorted beforehand. Don't do that.
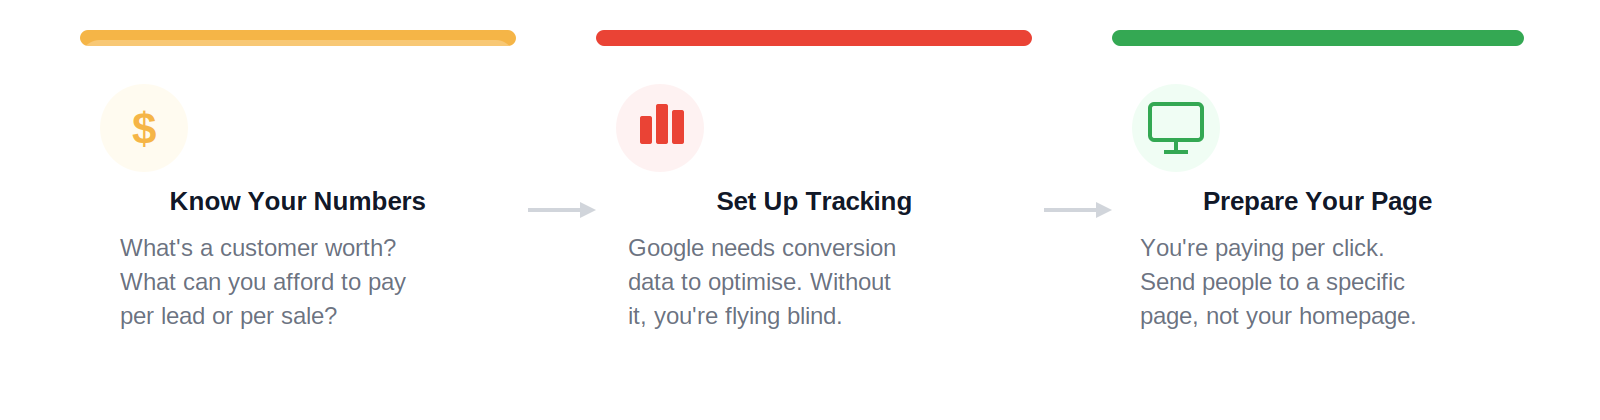
1. Know what a customer is worth to you
Before you set a budget, work out your numbers. What's a lead worth? What's a sale worth? If your average job is $2,000 and you close 1 in 4 leads, each lead is worth $500. You can spend quite a bit per click and still profit. If you sell $60 products at tight margins, your math looks very different. Know this before you spend a dollar.
2. Set up conversion tracking
Conversion tracking tells Google when someone completes a valuable action after clicking your ad: a form fill, a phone call, a purchase. Without it, you can't see what's working. We cover the setup in Section 6 below. For now, mark it as non-negotiable.
3. Sort your landing page
You're paying for every visitor. Don't send them to your homepage and hope for the best. The page someone lands on after clicking your ad needs to:
- Match exactly what your ad promises
- Have one clear action for the visitor to take
- Load fast — aim for under 3 seconds on mobile. Slow pages raise your costs and kill conversions.
- Have social proof: reviews, trust signals, credentials
How Google Ads Actually Works
Most beginner guides skip this. Understanding the auction changes how you approach keywords, bids, and ad copy.
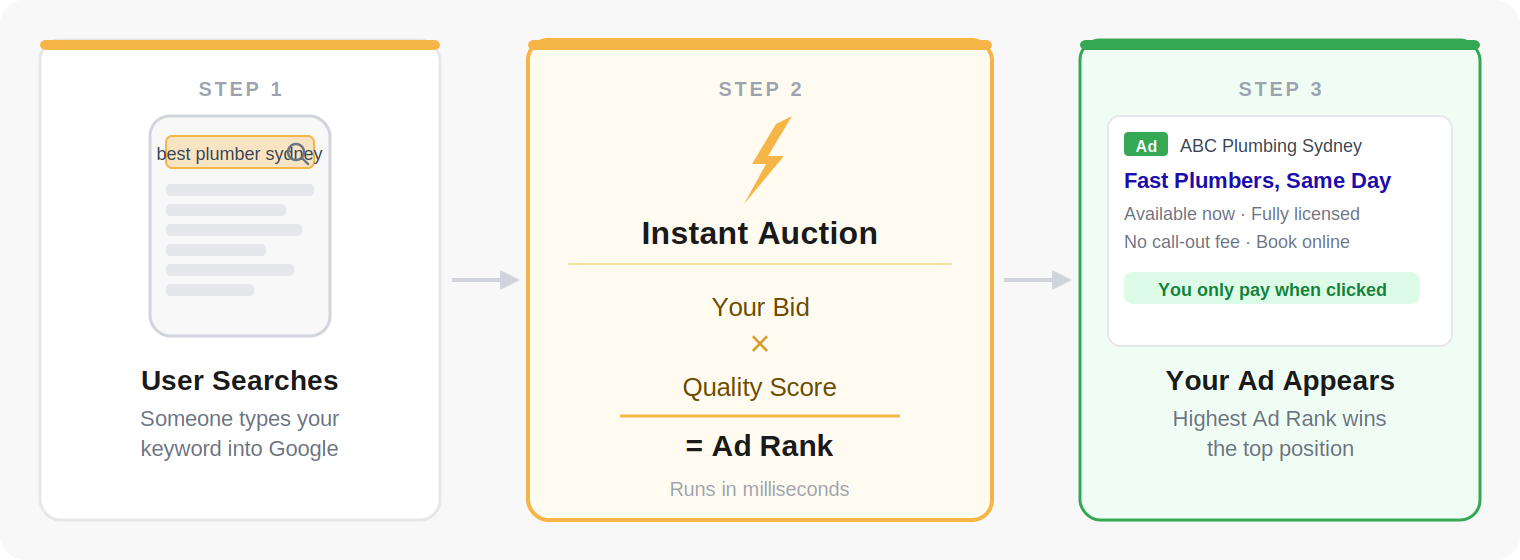
Every time someone searches on Google, an auction runs in milliseconds. And it's not just who bids the most that wins.
Google uses Ad Rank: a combination of your bid and your Quality Score. Quality Score is based on how relevant your ad is to the search, how relevant your landing page is, and the expected click-through rate.
A well-structured campaign with relevant ads and a good landing page can outrank competitors bidding more. That's the quality advantage. Getting the foundations right is how you compete without overspending.
You only pay when someone clicks. The amount you pay is determined dynamically in the auction and is often less than your maximum bid, but the exact mechanics are opaque and vary by auction.
Which Campaign Type Should You Start With?
Google gives you several campaign types. Here's what each one does and whether you should use it as a beginner.
Search Campaigns
Text ads that appear when someone searches for your keywords. The highest-intent traffic on the platform. These people are actively looking. This is where beginners should start.
Shopping Campaigns
Product listings with images and prices. If you sell physical products online, start here alongside Search. Requires a product feed set up in Google Merchant Centre.
Display Campaigns
Banner ads on websites across Google's network. Lower intent, harder to convert. Add these later once your Search campaigns are profitable and you understand your numbers.
Performance Max
Google's AI-driven campaign that runs across Search, Shopping, YouTube, Gmail, Display and Discover. Needs solid conversion tracking and ideally 30+ conversions/month to learn effectively. Most practitioners run Search first to prove profitability, then layer PMax in as a second campaign.
Shopping campaigns regularly outperform Search for eCommerce. They show your product image, price, and store name right in the search results. The setup process is the same as this guide; you just also need a product feed connected via Google Merchant Centre. Standalone Shopping is easier for a first campaign, but once you have ~30 conversions/month, most eCommerce accounts graduate to Performance Max as the primary shopping vehicle.
Setting Your Budget
There's no set figure. But there's a practical way to think about it before you pick a number.
A budget rule of thumb
When you move to automated bidding (which we'll cover in Step 4 of the setup), Google's algorithm needs enough spend to gather data and optimise. One popular heuristic: set your daily budget to roughly 10x your target cost per conversion. It's not a Google-published rule, but it aims to give Smart Bidding room to generate ~30 conversions/month — the threshold where most Smart Bidding strategies stabilise.
If $500/day sounds like a lot, that's because it is. For most small businesses starting out, that's not realistic. The honest reality: lower budgets mean the algorithm takes longer to learn. That's fine. Start at a level you're comfortable with. Even $20–$50/day can generate useful data. Prove the campaign works, then scale.
In competitive Australian service verticals (plumbing, electrical, legal, cosmetic), CPCs regularly run $8–$25+ AUD. A $20/day budget might buy you 1–3 clicks a day. If you're in a high-CPC vertical, factor that into your budget expectations before you launch.
On any given day, Google can spend up to 2× your daily budget to capture high-traffic periods. It balances out over the month: your monthly charges won't exceed your daily budget × 30.4. So a $50/day budget means up to $100 on a big day and a maximum of $1,520 per month. Set an amount you're genuinely comfortable with for at least 4 to 6 weeks of testing.
Step-by-Step Campaign Setup
Here's exactly how to build your first Search campaign. Follow these in order.
Create Your Google Ads Account
Go to ads.google.com and sign in with your Google account. Google will walk you through the initial account creation.
Google's onboarding flow defaults to pushing you into a "Smart Campaign," which gives you almost no control and is difficult to optimise. Look for a link to "Switch to Expert Mode", "Without guidance", or "Create an account without a campaign" — the exact wording varies depending on where you are in the flow. Any of these get you out of the guided wizard and into the full Google Ads interface with real campaign settings.
Choose Your Goal & Campaign Type
Click + New Campaign. Google will ask for a goal:
- Sales: you want purchases on your website
- Leads: you want form fills, calls, or enquiries
- Website Traffic: only choose this if tracking isn't ready yet
- Without a goal: if you see this option, consider it — goals act as guardrails that hide certain settings from you, so experienced advertisers often skip selecting one to see every available option
Then choose Search as your campaign type and click Continue.
Campaign Settings
This is where most beginners make expensive mistakes. Pay close attention to these settings.
- Campaign name: Be specific. "Search – Plumbers – Sydney – Non-Brand" is better than "Campaign 1". You'll thank yourself later.
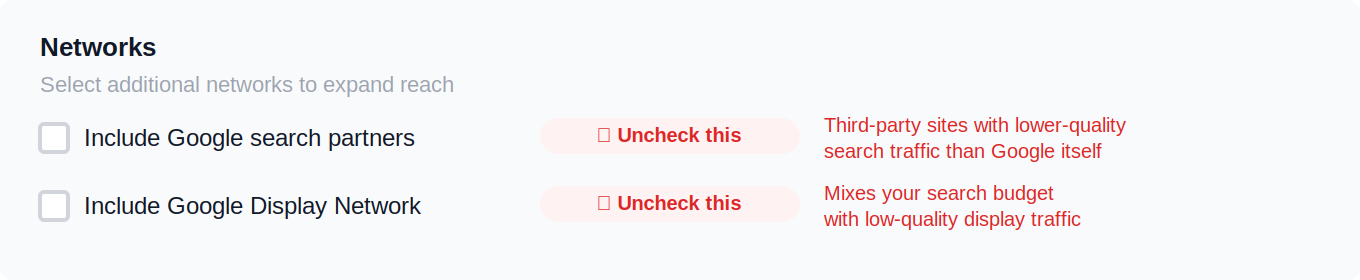
- Networks: Uncheck everything in the Networks section — "Include Google search partners" and "Include Google Display Network" are both ticked by default, and both should be turned off. Google spends leftover budget on these lower-quality placements and they rarely produce good results. Your ads will still show on Google Search itself.
- Locations: Target your actual geographic area. You can enter multiple suburbs or postcodes in bulk via the advanced search.
- Location options (the setting almost everyone misses): Underneath your location list, open "Location options". Google's default is "Presence or interest", which shows your ad to anyone Google thinks is interested in your location — including people who don't live there. Change it to "Presence: People in or regularly in your included locations". Only stick with Presence or interest if you genuinely want to reach out-of-area people.
- Language: English (or whichever language your target audience searches in).
- Audience segments: Skip these at setup. Add audience targeting later once you've collected real performance data.
Open "More settings" — three things worth changing
- Ad rotation: "Do not optimise" (at least at first). The default is "Optimise: Prefer best performing ads", which sounds sensible but means Google will pick one or two winners early and starve the rest of impressions before they've had a fair shot. Set it to Do not optimise while you're learning, then switch to the default later once you have data.
- Ad schedule: Don't run ads 24/7 if you can't service enquiries after hours. A plumber running ads at 3am attracts calls they can't convert — and international searchers in the wrong timezone. Set hours that match when your business can actually respond.
- Political ads: Unless you're running political content, select No.
Set Your Budget & Bidding Strategy
Daily budget: Enter the number from Section 4.
Bidding strategy: what to choose
- Start with Maximise Conversions. Once your conversion tracking is set up properly, this is the simplest place to begin. It aims bids at the clicks most likely to convert rather than the cheapest clicks, and it'll stabilise over the first week or two.
- If Maximise Conversions isn't working — which can happen on smaller accounts with low search volume or limited conversion data — switch to Manual CPC. You set your own bids per keyword and keep full control. It's more hands-on but more predictable when there isn't enough data for Google's algorithm to learn from.
- Leave Target CPA unchecked at first — even once you have conversions. Let Maximise Conversions run without a target for a few weeks so Google establishes what your natural cost per conversion looks like. Once you have 30+ conversions over 30 days and a clear baseline, you can add a Target CPA within the Maximise Conversions setting.
- Customer Acquisition setting: leave unchecked. This setting lets Google bid differently for new vs returning customers. Don't touch it at setup — it's something to test later once you have a baseline.
Google's setup flow now pushes two AI features: AI Max for Search (an AI overlay that rewrites queries, expands keyword matching, and generates assets) and AI-generated ad copy. Both are on or suggested by default. For a first campaign, turn AI Max off and write your own headlines and descriptions. AI Max frequently spends aggressively without corresponding results, and AI-written copy tends to be generic and off-brand. You can test AI Max as a controlled experiment later, once you have a clean baseline to compare against.
Google's automated bidding is genuinely powerful once it has data. If you flip it on before conversion tracking is working, it's essentially guessing. Get tracking right first, then let the data accumulate.
Set Up Keywords & Ad Groups
We'll cover keywords in depth in Section 7. For now: create at least one ad group, add 5–15 closely themed keywords, and use Exact Match format: [keyword] with square brackets.
Add your initial negative keywords here too (covered in Section 7).
Write Your Ads
Full ad copy guidance is in Section 8. For each ad group you'll write up to 15 headlines (30 chars each) and up to 4 descriptions (90 chars each). Aim for Good or Excellent Ad Strength. Make sure at least one headline includes your main keyword.
Add Ad Assets
Ad assets (previously called extensions) add extra lines to your ad at no extra cost. They improve click-through rate and ad rank. Add these before you launch:
- Sitelinks: links to your key pages (Contact Us, Services, Reviews)
- Callouts: short phrases like "Licensed & Insured" or "Available 24/7"
- Call asset: adds your phone number for one-tap calling
- Location asset: shows your address if you have a physical location
- Business name and logo: Google uses these in visual ad formats
- Image assets: upload 3–5 high-quality images of your work or team
Enter Billing Details
Add your business address and payment method. For Australian accounts, use AUD and add your ABN if you're GST-registered (this affects how Google invoices you). Google charges in arrears — you'll be billed when your account reaches a threshold or at the end of 30 days, whichever comes first.
Review Everything, Then Launch
Before you click Enable: check your campaign settings, proofread all ad copy, confirm your landing page URLs are correct, and verify your conversion tracking is live (covered in Section 6).
Once you're confident everything is correct, enable the campaign. Keep a close eye on it for the first few days. If something looks obviously wrong — budget spent by 9am, ads triggering for irrelevant searches — fix it immediately.
Let the campaign gather data before you start optimising. Pulling keywords or pausing campaigns after 3 days of data isn't optimising. It's guessing. Give it time.
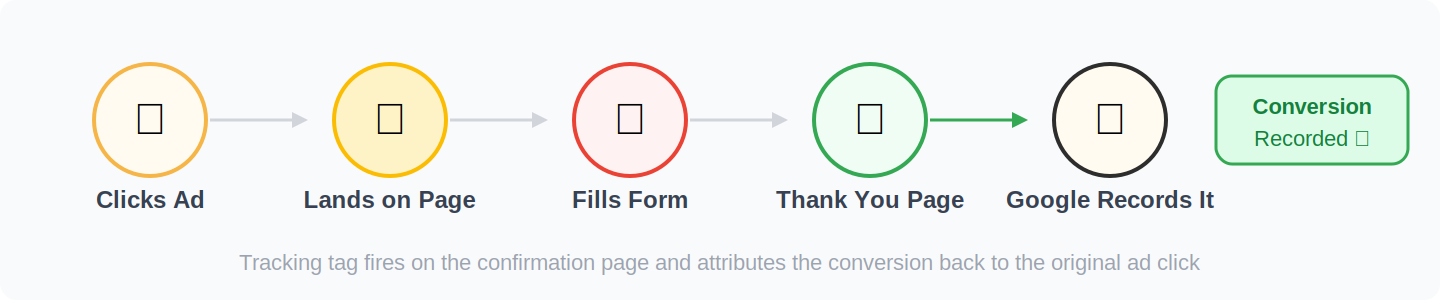
Conversion Tracking: Don't Skip This
Conversion tracking tells Google when someone completes a valuable action after clicking your ad: a form fill, a phone call, a purchase.
Without it, you can't see which keywords are generating leads. You can't see what your cost per acquisition is. Smart Bidding has nothing to optimise against. You're spending money with zero visibility.
How to set it up in Google Ads
- Go to Tools & Settings → Measurement → Conversions
- Click + New Conversion Action → Website
- Name it clearly (e.g., "Contact Form Submission"), set the category and value
- Install the tracking tag directly on your site, or via Google Tag Manager if you're comfortable with it
- Test it yourself: complete the action on your own site and verify it appears in the Conversions dashboard
What should you track?
- Service businesses: Form submissions, phone calls (use Google's built-in call tracking)
- eCommerce: Purchases, with the actual revenue value passed through where possible
- Secondary actions: Add to cart, checkout starts. Useful signals, but don't make these your primary conversion goal.
Primary vs Secondary conversions — this matters
In your Conversion settings, each action can be set as "Primary" or "Secondary". Google's Smart Bidding only optimises toward Primary conversions. If you accidentally mark a micro-conversion like "Add to Cart" as Primary alongside a purchase, your bidding will chase the wrong thing. Set only your most valuable action (usually a purchase or a qualified lead form) as Primary. Everything else is Secondary.
You can import conversions directly from GA4 into Google Ads: Tools → Conversions → Import → Google Analytics 4. Faster to set up and keeps your data consistent across platforms.
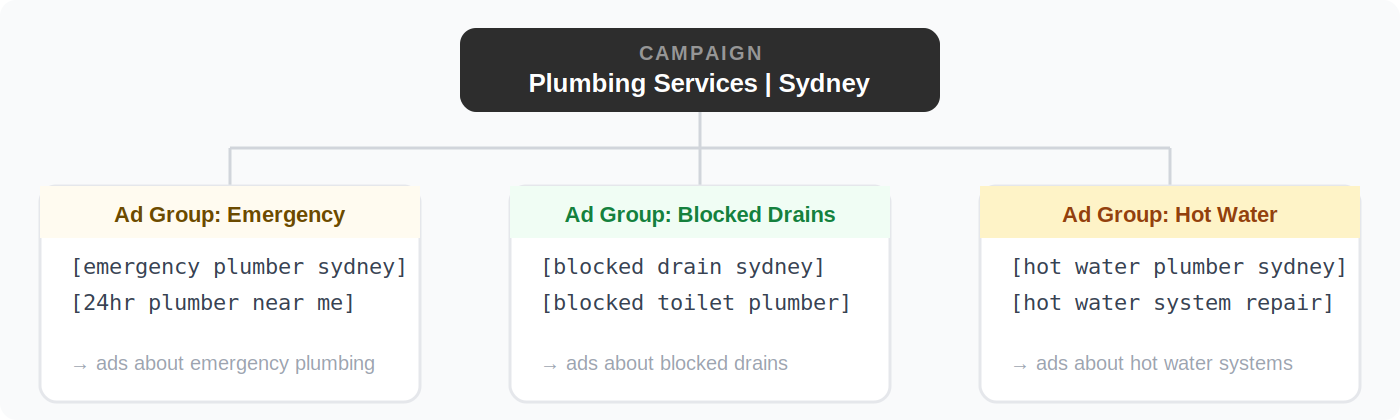
Keywords & Ad Groups
Keywords are what trigger your ads. Get these right and your ads show for searches that convert. Get them wrong and you pay for clicks that never will.
Start with keyword research
Use Google Keyword Planner. It's free and it's inside your Google Ads account under Tools → Keyword Planner. Type in your service or product and it shows you what people actually search for, how often, and roughly what it costs per click.
Look for keywords with clear purchase or enquiry intent. "Emergency plumber Sydney" converts. "How to fix a leaking tap" doesn't.
Keyword match types: start narrow
Match types control how closely a search needs to match your keyword before your ad triggers.
When you add keywords, Google quietly defaults them to Broad Match. This means your ads can show for loosely related (and sometimes completely irrelevant) searches. Start with Exact Match using square brackets. You can always broaden later once you know what's working.
How to structure your ad groups
One ad group = one theme. Each ad group has its own set of keywords and its own ads. Keep them tightly focused. A user who searches "emergency plumber" should see an ad about emergency plumbing, not a generic ad about everything you offer.
Add negative keywords before you launch
Negative keywords stop your ads showing for irrelevant searches. Without them, you'll pay for clicks that will never convert. Add these as a starting list:
- "free": people searching this aren't ready to pay
- "jobs", "careers", "apprentice": job seekers, not customers
- "DIY", "how to", "YouTube": people who want to do it themselves
- "training", "course", "certificate": people trying to learn the trade
Then, every week after launch, review your Search Terms report and add any irrelevant searches that are triggering your ads. This is an ongoing job, not a one-time task.
Writing Your Ads
You get up to 15 headlines (30 characters each) and up to 4 descriptions (90 characters each). Google mixes and matches these, so every headline needs to stand alone and make sense on its own.
Ad copy that actually gets clicked
- Put your keyword in Headline 1. Google bolds it when it matches the search. Instantly more attention-grabbing.
- Lead with the benefit, not the feature. "Same-day service" beats "Experienced team" every time.
- Address the main objection. What stops someone from calling? "No call-out fee", "Fixed prices, no surprises", "Fully licensed and insured."
- Use numbers. "500+ 5-star reviews", "20 years experience", "From $99." Specifics are more credible than generalities.
- End with a clear CTA. "Get a Free Quote", "Book Online Today", "Call Now for Same-Day Service."
- Write it yourself. Don't use Google's AI-generated suggestions. They're generic. Your ad copy needs to reflect your actual business and what makes you different.
- Check mobile. Make sure headlines don't get cut off with "..." on a phone screen. That's where most clicks happen.
After You Go Live
Google Ads is not set-and-forget. The businesses that get good results review it regularly, make small improvements, and make decisions based on data rather than gut feel.
The first two weeks: watch, don't panic
Give your campaign time to gather data before you start making changes. Google's algorithm needs time to learn. Don't pause keywords or make big bid changes based on 3 days of results. Check it daily to catch anything obviously wrong. But let it run.
The four metrics that matter
Your weekly tasks
- Search Terms report: Find irrelevant searches triggering your ads, add them as negatives. Do this every single week.
- Budget pacing: Is your daily budget being fully used? Running out by midday? Adjust if needed.
- Keyword performance: Any keywords with 50+ clicks and zero conversions need attention. Pause them or investigate why.
- Conversion data: Is tracking still recording correctly? Numbers that stop suddenly usually mean a broken tag.
Mistakes That Cost Beginners the Most
These aren't edge cases. They show up in almost every new account.
Skipping conversion tracking
You have no idea what's working without it. Set it up before your campaign goes live. Non-negotiable.
Using only Broad Match keywords
Google defaults to Broad Match. It'll trigger your ads for all sorts of irrelevant searches and waste your budget fast. Start Exact, expand later.
Sending traffic to the homepage
If someone searches "emergency plumber Sydney" and lands on your homepage, they have to work to find what they need. Match the landing page to the ad. Always.
Leaving Display Network on
Google ticks "Include Google Display Network" by default in campaign settings. Uncheck it. Display and Search traffic behave completely differently. Keep them in separate campaigns.
No negative keywords
Without negatives you'll pay for clicks from people searching for jobs, free stuff, and DIY how-to content. Build your initial negative list before launch and add to it weekly.
Pulling the plug too early
New campaigns need time. Pausing everything after a week of no conversions isn't a decision. It's a reaction. Give it at least 2 to 4 weeks with enough budget to generate meaningful data before drawing conclusions.
Accepting Google's recommendations blindly
Google's Recommendations tab will constantly push things like: switch keywords to Broad Match, raise your budget, enable Search Partners or the Display Network, turn on AI Max, adopt AI-generated ad copy, or flip on "auto-apply" so Google makes changes without asking you. Most of these benefit Google's revenue more than yours. Some are genuinely useful. Read each one, understand what it'll change, and reject the rest. Never enable auto-apply on a new account.
Pre-Launch Checklist
Work through this before you click Enable. Don't launch without ticking every box.
- Target cost per conversion defined
- Landing page is live and loads fast
- Clear call-to-action on landing page
- Social proof on landing page (reviews/trust signals)
- Conversion tracking tag installed
- Tested and confirmed recording correctly
- GA4 linked (if applicable)
- Primary vs Secondary goals set correctly (only key actions as Primary)
- Search only (Display Network unchecked)
- Google Search Partners unchecked
- AI Max for Search turned OFF
- Location targeting set to "Presence" (not Presence or interest)
- Ad rotation set to "Do not optimise"
- Ad schedule matches your business hours
- Daily budget set and confirmed
- Bidding: Max Conversions (or Manual CPC for smaller accounts)
- Customer Acquisition setting unchecked
- Ad groups split by theme
- Using Phrase or Exact Match (not Broad)
- 5–15 keywords per ad group
- Ad-group-level negative keywords added
- Account-level negative keyword list added
- At least 3 headlines written (aim for all 15)
- At least 2 descriptions written (aim for all 4)
- Ad copy written by you (not AI-generated)
- Keyword appears in at least one headline
- Ad Strength rated Good or Excellent
- Sitelink assets added
- Call asset added
- Callout assets added
- Business name asset added
- Business logo uploaded
- Image assets uploaded (3–5)
- Billing details entered (AUD, with ABN if GST-registered)
- All ad copy proofread
- All landing page URLs correct
- Weekly review time blocked in calendar
Once your first campaign is profitable, there's more to learn: campaign segmentation, Performance Max, automation scripts, and scaling strategy. We cover all of it at Websites That Sell.
Talk to Our Google Ads Team →